How to Install Kali Linux on Oracle VM VirtualBox
- Dhyey Vachhani

- May 22, 2022
- 4 min read

This guide will help you to install Kali Linux on VirtualBox. If you are doing it for the first time then don't worry as we will discuss step by step process in detail.
While writing this guide, version of Kali is 2022.2 and VirtualBox is 6.1

Kali is an Operating System by Offensive Security. Unlike regular Operating Systems like Windows 10 or Mac OS, Kali focuses on Penetration Testing. Kali was initially known as Backtrack OS and is built on Debian Architecture. Kali is a pretty flexible OS and can be deployed on a PC/Laptop, Raspberry Pi, or Live USB and you can even run it from your Windows 10 and 11. I might try to create a guide for all the mediums mentioned above but for now, let's get started.
Step #1 - Download Kali iso
To install Kali we need an iso. For that we will navigate to https://www.kali.org/. You can also search in Google by typing Kali OS. or click on the top banner to directly visit the website. Once you reach the home page, click on Download button.

Next choose Bare Metal

Now, here you will see multiple options to choose from. For this tutorial we will go ahead and choose Everything. Everything as the name suggests, consists of all tools Kali has to offer. This iso is the biggest in size and can only be downloaded using BitTorrent or qBittorrent.

Once the Torrent file is downloaded you can find it in your default download location of the computer. Go ahead and open the file and it should open in Torrent window.

I am using qBittorent so it opened in qBittorent window.

Now go ahead and click on Ok button. The file should start downloading and you can check the progress in your Torrent window.

Once the file is downloaded, you can find the file in the default download location of your computer. As of now we don't need it as we will go ahead and install VirtualBox and then visit back this file.
Step #2 - Download VirtualBox
Downloading VirtualBox is very easy process. Just head over to Google and type 'Oracle VirtualBox' in the search box or visit https://www.virtualbox.org/

On homepage, we will be greeted with a big blue box with Oracle VirtualBox's latest number. Go ahead and click on the button and it will take us to the download page.

Here we will download 2 items. First, is the VirtualBox installer, and the second will be the guest additions extensions pack. Click on 'Windows Hosts' and 'All supported platforms' links as shown in the below picture.

Once both files are downloaded, we will navigate to downloads folder on your computer to install them.

Step #3 - Install VirtualBox and Guest Additions
Here double click on VirtualBox 6.1.34 installer and it should open the VirtualBox installer.

From this point, click next and do not change any default settings.


After the installation is complete, click on Finish button and it should launch VirtualBox instance.

Now to install Guest Additions, Go to the downloads folder and click on Oracle_VM_VirtualBox_Extension_Pack-6.1.34. Agree to terms and conditions and it will install Guest additions. (Guest additions is required for better Virtual Machine functionality. It adds support for USB 3.0, display orientations, and more)

Once the installation completes it will greet you with installation complete dialog box.

Step #4 - Deploy Kali VM in VirtualBox
To Deploy Kali, click on New button to create an OS Shell.
Now follow the below screenshots to replicate settings in your own VM and create a Shell.


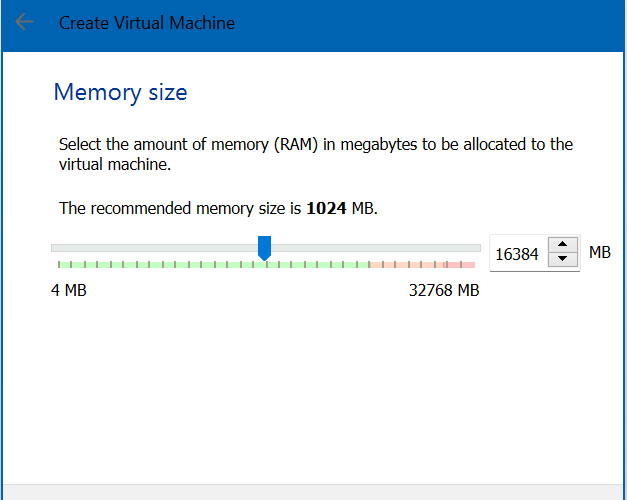


Once you click Finish, you should see a shell on left hand side of the screen with name KaliOS. Once you see it, do not start it but click on Settings to further tweak some settings.

Allocate appropriate Processor count for your VM. Always stay on the green side while allocating resources as allocating too many resources might crash the host OS.

Now under Storage, choose the disk file option to allocate Kali iso file that we downloaded previously

Choose Kali OS iso file and click on Ok

Click Ok and our VM should be good to launch

Now click on Start button and it should fire up our Kali VM.

Step #5 - Install Kali OS
Once Kali VM is fired up, we will need to do some basic settings like setting time zone, host name, supply username, password, and more. Follow the below screenshots to mirror the settings on your VM.


Once the basic settings and installation is done we will be greeted with Kali home screen.

Explore Kali to your heart's content
Finally, we have successfully installed Kali in VirtualBox. Take this opportunity and explore Kali OS and the tools it has to offer. Kali also offers great documentation to get you started. Open Firefox in Kali and the homepage of Firefox has some great Kali articles. In our next article, we will discuss using Beef, one of Kali's best social engineering tools to take control of a browser.


Comments